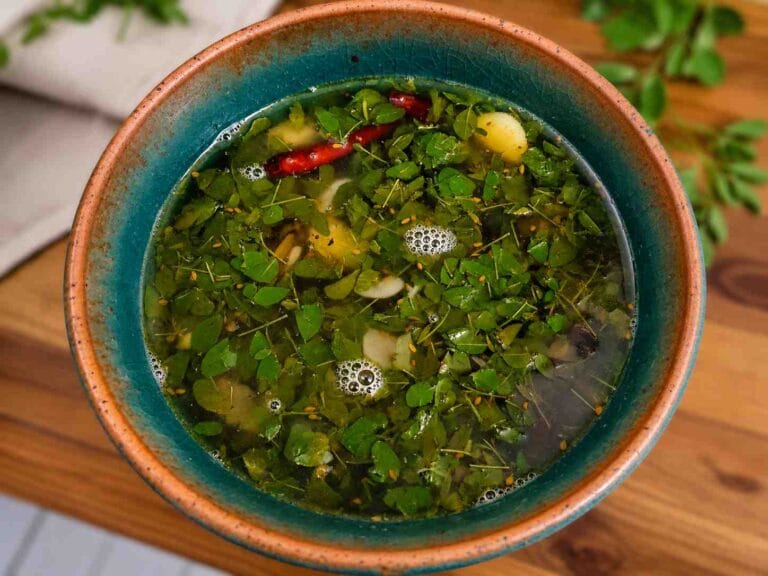
Iron Rich Siru Keerai Masiyal Without Dal | Easy & Healthy Recipe
Looking for a simple iron rich keerai recipe you can make on a busy day? This siru keerai masiyal without dal is one of the recipes I make regularly at home, especially when I want something light, healthy, and easy to cook.
I usually cook keerai in a clay pot because it gives a better taste and feels more traditional. But for this recipe, I used a pressure cooker as an energy-saving option due to the current gas situation. Cooking in a clay pot takes more time, and while it is healthy and flavorful, I wanted a quicker method for everyday cooking.
That said, I still didn’t want to miss that clay pot flavor. So I finished the dish with garlic tempering in a clay pot, which really brought back that homestyle taste and made the recipe feel complete.
I recently bought a new clay pot and seasoned it, and this was the first recipe I made in it. If you’re just getting started, I’ve shared a simple step-by-step guide on how to season a clay pot for cooking — it will help you avoid common mistakes.
At home, we usually enjoy this keerai masiyal with hot rice, a little ghee, and a side of fish fry or potato fry—it’s a simple meal, but very satisfying.
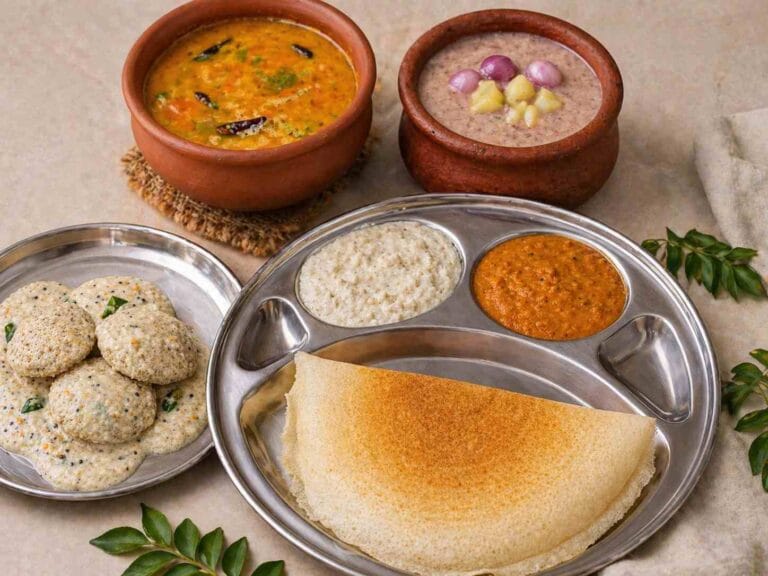
If you enjoy simple South Indian meals, you can also try my vendhaya paruppu kootu.
What is Keerai Masiyal?
Keerai masiyal is a simple and traditional South Indian dish made by cooking leafy greens (keerai) until soft and then mashing it to a smooth texture. It is usually prepared with basic ingredients like onion, garlic, and spices, making it a light and everyday comfort food.
There are many ways to make keerai masiyal—some versions include dal, while others like this recipe are made without dal for a lighter and quicker meal. It is commonly served with hot rice and ghee as part of a regular South Indian lunch.
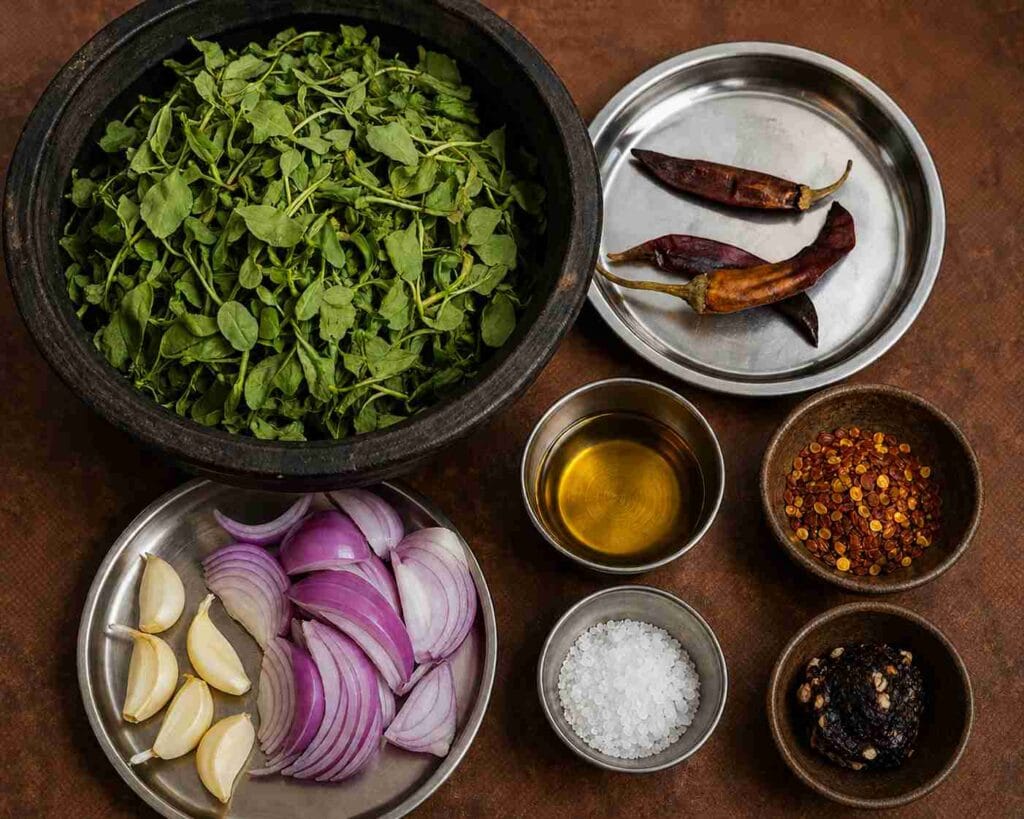
Ingredients for Siru Keerai Masiyal Recipe
To make this easy siru keerai masiyal , you will need the following ingredients:
- 1 bunch siru keerai (cleaned, washed, and drained)
- 1 medium onion (roughly chopped)
- 7 cloves garlic (peeled)
- 3 dry red chillies
- 1 small piece tamarind
- 1/4 tsp turmeric powder
- Salt to taste
For tempering:
- 1–2 tbsp oil
- 1 medium onion (finely chopped)
- 7 cloves garlic (lightly crushed or whole)
- Red chilli flakes (as needed)
This is similar to sutta kathirikkai masiyal, which is another easy mashed dish.
Step-by-Step Preparation of Keerai Masiyal
Follow these simple steps to make a healthy and iron rich siru keerai masiyal without dal at home.
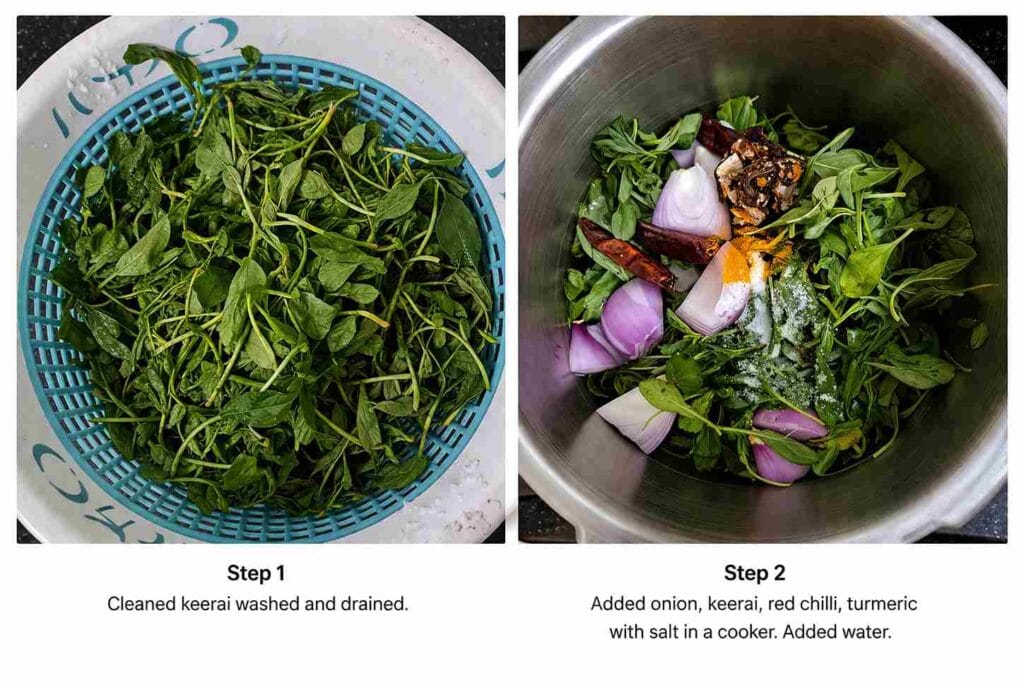
Step 1: Clean and Prepare the Keerai
- Clean the siru keerai thoroughly, remove any thick stems, wash it well in water, and drain completely.
Step 2: Add Ingredients to Cooker
- In a pressure cooker, add the cleaned keerai along with roughly chopped onion, dry red chillies, turmeric powder, tamarind, salt, and a little water.
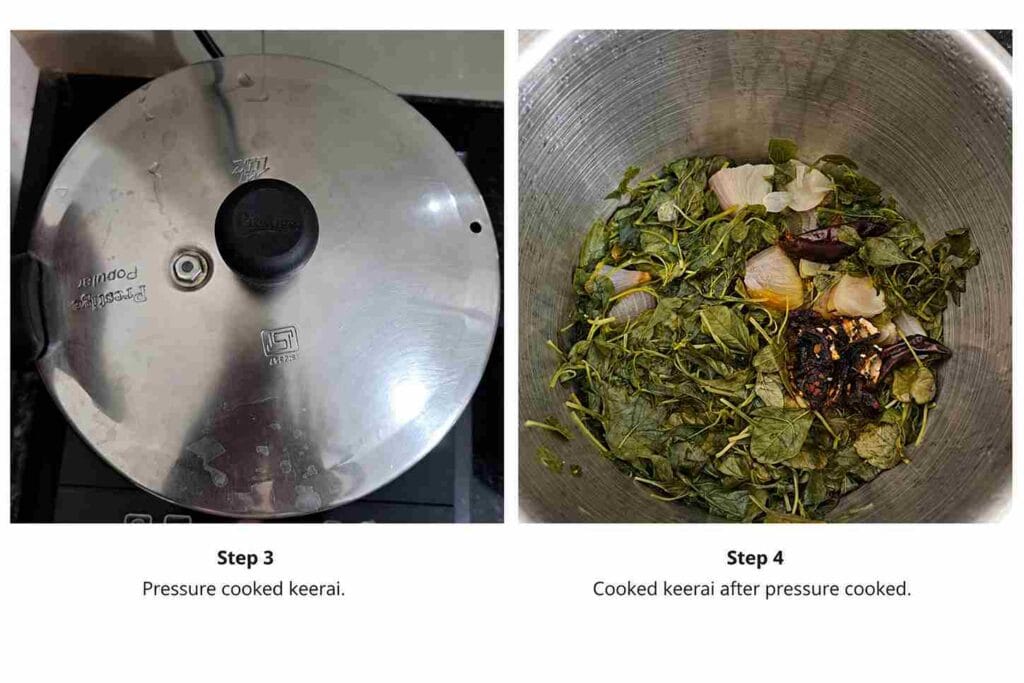
Step 3: Pressure Cook the Keerai
- Close the pressure cooker and cook the keerai mixture for about 3 whistles until it becomes soft and well cooked
Step 4: Check Cooked Keerai
- Once the pressure is released, open the cooker and check if the keerai is fully cooked and softened along with the onions and spices.
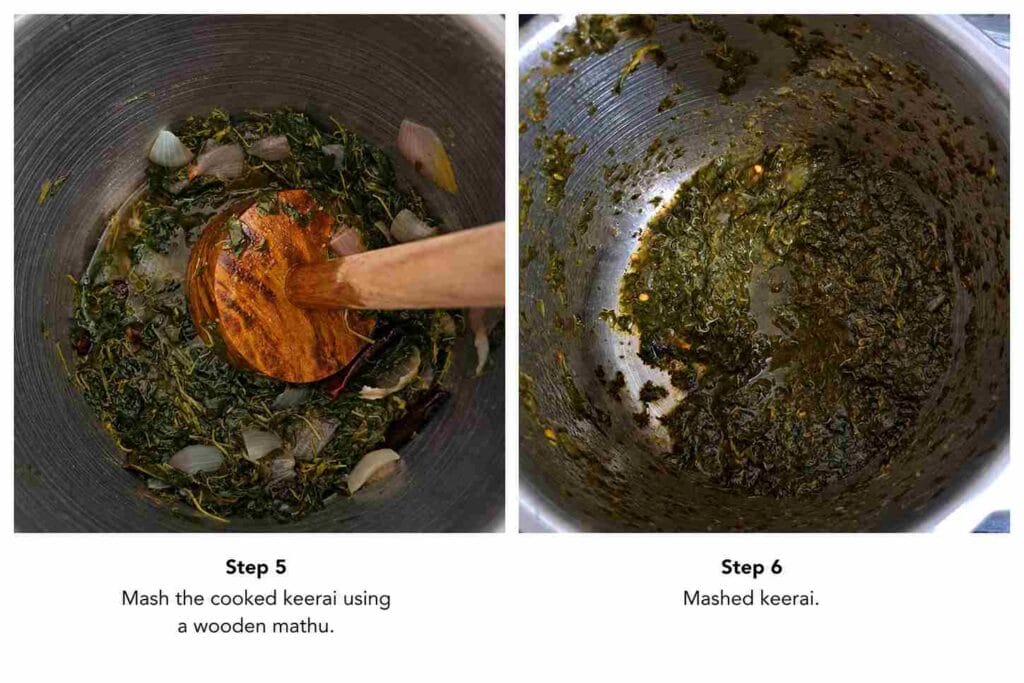
Step 5: Mash the Cooked Keerai
- Using a wooden mathu /masher, gently mash the cooked keerai until it becomes soft and well combined.
Step 6: Get Smooth Masiyal Texture
- Mash the keerai until you get a soft, slightly coarse texture. Avoid over-mashing to keep the natural texture of the greens.
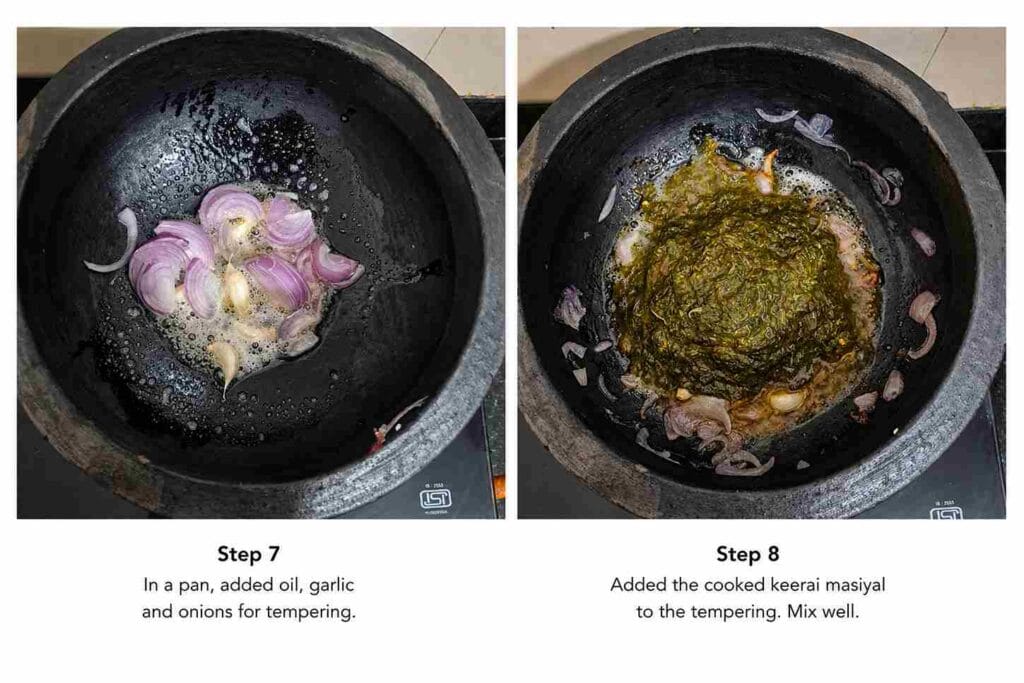
Step 7: Prepare Garlic Tempering
In a clay pot or pan, heat oil and add peeled garlic cloves. Saut until they turn slightly golden (this increase the flavor of this dish ), then add sliced onions and cook until soft and translucent.
Step 8: Add Mashed Keerai and Mix
Add the mashed keerai to the tempering and add 1/2cup of water mix well.
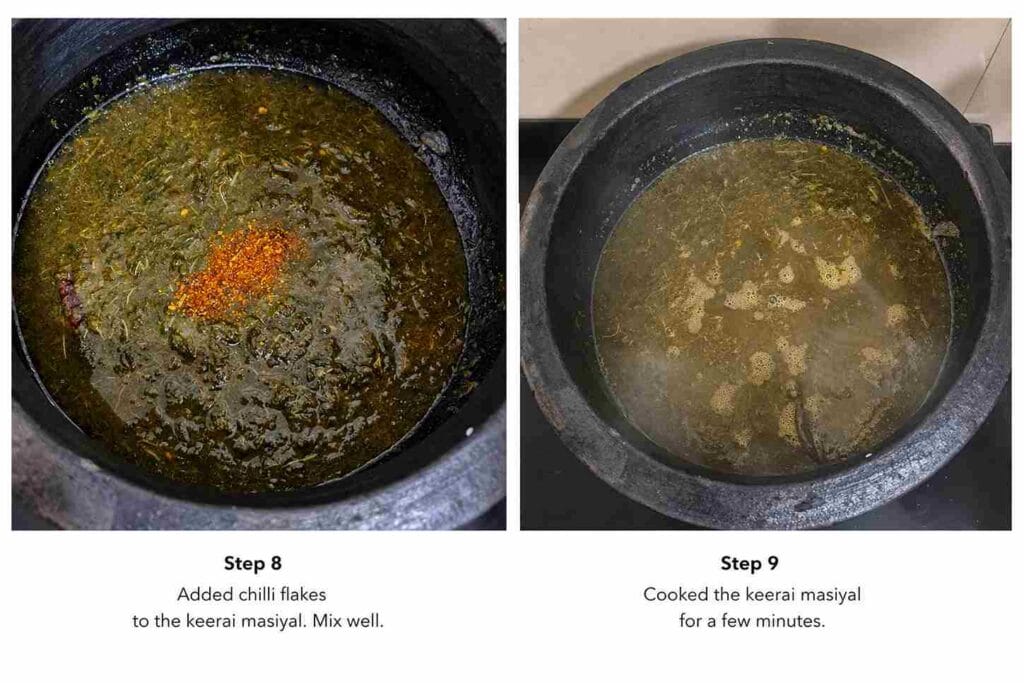
Step 9: Add Chilli Flakes for Extra Spice
Add chilli flakes to the keerai masiyal and mix well to enhance the flavor and spice level.
Step 10: Simmer and Finish Cooking
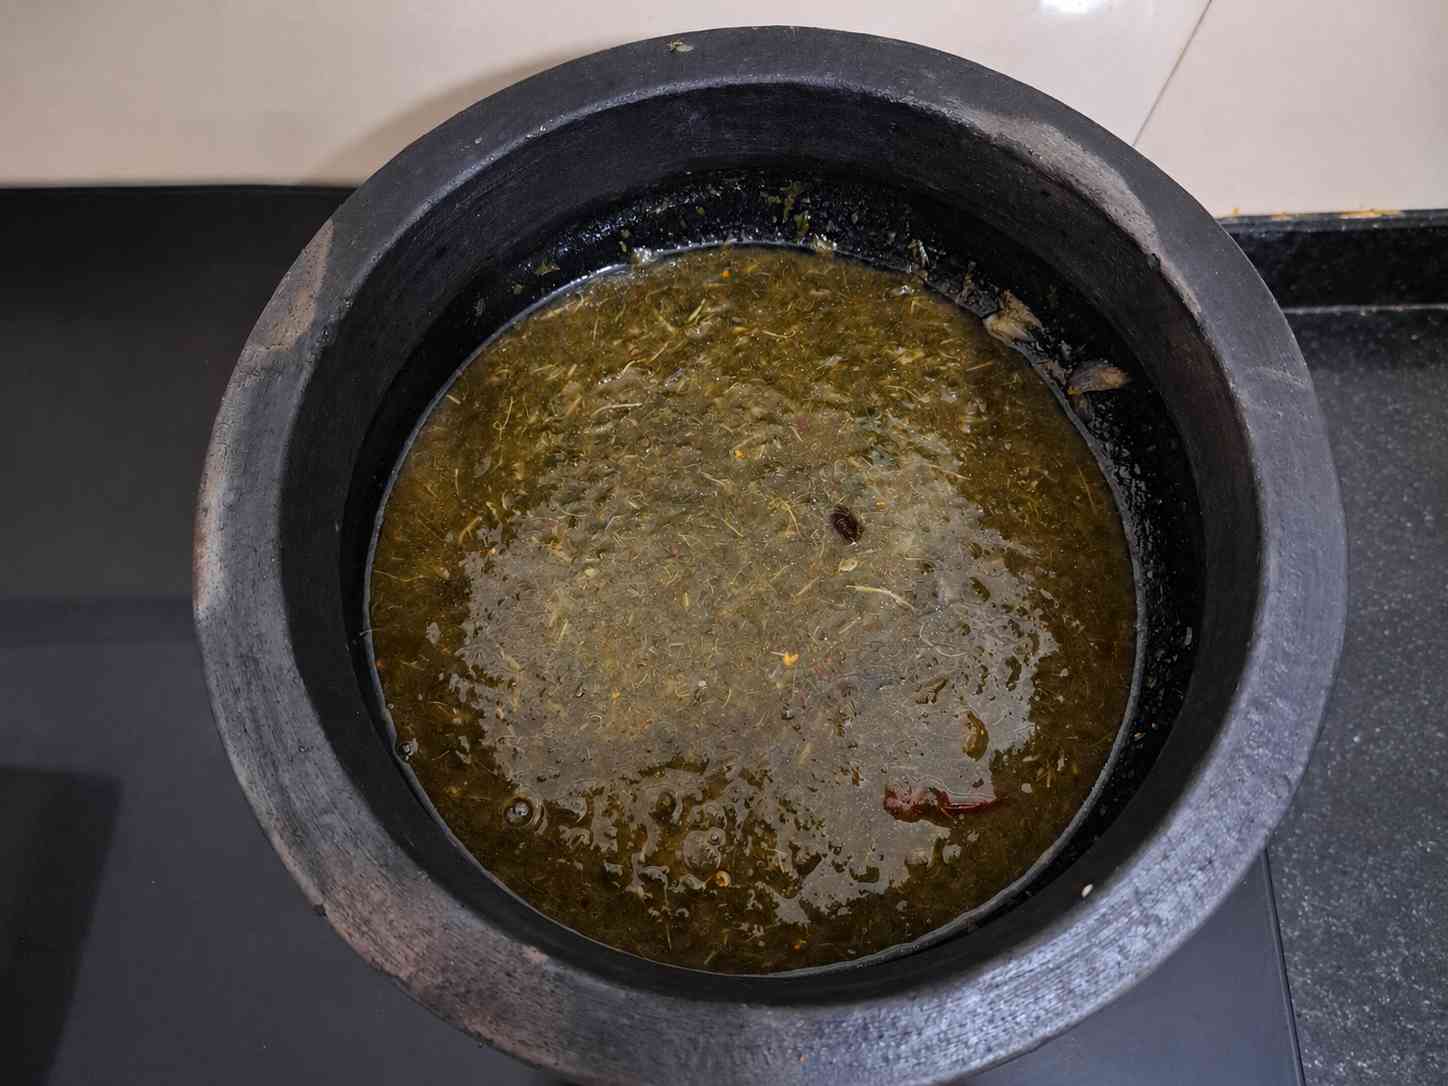
Let the keerai masiyal cook for a few minutes on low flame until it slightly thickens and the flavors blend well.
Tips & Variations for Siru Keerai Masiyal
- Use fresh siru keerai for best taste and nutrition. Avoid yellow or wilted leaves.
- Do not overcook keerai after pressure cooking—overcooking can reduce nutrients. 3 whistles is optimal.
- Mash using wooden mathu for authentic texture instead of a mixer (metal mixers can oxidize nutrients).
- Adjust water carefully—keerai releases water while cooking, so don’t add too much. Start with ¼ cup and adjust as needed.
- Finish in clay pot if possible for better flavor and traditional taste. The clay’s minerals subtly enhance the dish.
- Clean keerai thoroughly: Wash 2-3 times in running water to remove mud and soil completely. This is crucial for food safety.
- Tamarind matters: Use raw tamarind paste, not the sweetened kind. It’s essential for iron absorption and traditional flavor.
Iron Rich Siru Keerai Masiyal Without Dal
Ingredients
Equipment
Method
- Clean the siru keerai thoroughly, wash and drain well.
- In a pressure cooker, add keerai, onion, red chillies, turmeric, tamarind, salt, and a little water.
- Pressure cook for 3 whistles until soft.
- Let the pressure release and check the cooked keerai.
- Mash the keerai using a wooden mathu until soft.
- Heat oil in a clay pot or pan, add garlic and sauté until slightly golden.
- Add sliced onions and cook until translucent.
- Add the mashed keerai and mix well.
- Add chilli flakes and adjust spice.
- Let it simmer for a 3 minutes and serve hot.
Notes
- Wash keerai well – Clean 2–3 times to remove mud completely.
- Don’t add too much water – Keerai releases water while cooking.
- 3 whistles is enough – Overcooking can reduce nutrients and flavor.
- Garlic tempering is key – It adds the main flavor to this dish.
- Adjust spice – Add chilli flakes only at the end as per taste
Nutritional Variations:
Make it a complete meal (add protein):
- Add cooked moong dal or toor dal for a protein-rich version (transforms it from a 90-calorie side to a 150+ calorie complete meal)
- Pair with fish fry or egg curry for additional iron and protein
For a protein-rich option, check out pachai payaru kadayal recipe.
Make it lighter (for digestion):
- Use less oil (reduce to 1 tbsp) for a lighter version
- Skip the tempering and eat plain cooked keerai with a drizzle of ghee for maximum digestibility
Make it spice-customized:
- For kids: Skip chillies entirely, reduce tamarind
- For extra spice lovers: Add green chillies during cooking in addition to red chillies
- Add mustard seeds and urad dal tempering for a more traditional flavor profile
Flavor variations:
- Add ½ tsp of asafoetida (hing) during tempering for better digestion
- Include fresh curry leaves in the tempering for extra aroma
- Add a pinch of jaggery if you prefer a slight sweetness to balance the tartness
FAQs About Siru Keerai Masiyal Recipe
Is siru keerai safe during pregnancy?
Yes. It’s rich in iron, calcium, and folate—all essential during pregnancy. Ensure it’s thoroughly cleaned before cooking.
How often should I eat this for iron benefits?
3-4 servings per week is ideal for maintaining healthy iron levels. For anemia, consult your doctor for personalized advice.
Can kids eat this without chilli?
Yes. Simply skip red chillies and chilli flakes. The tamarind provides mild tang without spice.
Does pressure cooking destroy nutrients?
Pressure cooking reduces some vitamin C (20-30%), but iron and calcium are retained. 3 whistles is optimal—avoid overcooking.
What’s the best way to maximize iron absorption?
Pair with vitamin C sources: rice with lemon juice, tomato curry, or citrus for dessert. Avoid tea/coffee within 2 hours of eating.
Can I make this in a clay pot instead?
Clay pot cooking takes 20-25 minutes but gives better flavor. Regular pot: simmer 20 minutes on medium heat.
How is “without dal” different from regular keerai masiyal?
Lighter, quicker to digest, faster to prepare. Good for sensitive digestion or when avoiding legumes. Regular version has more protein.
Can I meal prep and freeze this?
Yes. Lasts 3-4 days refrigerated, 2 months frozen. Reheat gently on stove (avoid microwave to prevent mushiness).
Health Benefits of Siru Keerai: Why This Recipe is a Nutritional Powerhouse
Siru keerai is naturally rich in essential nutrients and is known for its many health benefits. This humble leafy green packs more nutrition than most people realize, especially when prepared correctly.
Rich in Iron for Hemoglobin & Energy Siru keerai contains approximately 3-4 mg of iron per 100g of cooked greens—higher than spinach and comparable to red meat. But here’s what matters: the iron in siru keerai is non-heme iron, which has lower bioavailability (10-15%) compared to animal sources. However, when you pair this keerai masiyal with rice and a source of vitamin C (like lemon or tamarind, which this recipe already includes!), you significantly boost iron absorption. The tamarind in this recipe is a smart addition—it’s acidic and enhances your body’s ability to absorb the iron, making this dish naturally optimized for fighting anemia and boosting hemoglobin levels.
Supports Digestion & Gut Health High in dietary fiber and naturally easy to digest, siru keerai masiyal is gentle on the stomach while promoting healthy digestion. The mashing process breaks down the cell walls, making nutrients more bioavailable and easier for your body to absorb. This is why this recipe is traditionally given to postpartum mothers and people recovering from illness—it’s nourishing without being heavy.
Light & Nutritious for Daily Meals At just 90 calories per serving, this is a guilt-free addition to any meal. Unlike dal-based versions, the “without dal” approach keeps this lighter and quicker to digest, making it perfect for everyday cooking. This is especially valuable during summer or for those with sensitive digestion.
Naturally Cooling & Perfect for Summer In South Indian traditional medicine (Ayurveda), leafy greens like siru keerai are classified as cooling foods. Regular consumption helps reduce body heat, prevents heat-related illnesses, and keeps you refreshed during hot months. This is why keerai masiyal is a staple summer lunch dish across South India.
Rich in Vitamins A & C for Eyes & Immunity Siru keerai is loaded with beta-carotene (converts to vitamin A) and vitamin C. Vitamin A supports eye health and night vision, while vitamin C boosts immunity and acts as an antioxidant. Together, they support skin health, fight inflammation, and protect against age-related diseases.
Contains Calcium for Bone Strength Often overlooked, siru keerai is a good plant-based source of calcium. Regular consumption supports bone density, which is especially important for women and the elderly. When served with ghee (as traditionally done), the fat-soluble calcium absorption improves.
Why This Recipe Maximizes Nutritional Benefits
- Pressure cooking: While it saves energy and time, pressure cooking at high heat can reduce some water-soluble vitamins (like vitamin C). However, siru keerai’s hardier nutrients (iron, calcium, beta-carotene) are preserved.
- Garlic tempering: Garlic contains allicin, a compound with antimicrobial and anti-inflammatory properties. The tempering step ensures you get these benefits.
- Tamarind addition: The tangy tamarind enhances iron absorption and aids digestion.
- Without dal: This lighter version is easier to digest and better suited for those avoiding legumes or preferring a quicker meal.
Want to Explore More Healthy Cooking?
This iron rich siru keerai masiyal is a great start for a healthy meal. But building a balanced diet is all about combining the right ingredients.
If you’re interested in traditional and nutritious food choices, you can also check out our complete millet guide, where I’ve explained different millets, their benefits, and easy ways to use them in everyday meals.
👉 Read the Complete Millet Guide
Share Your Keerai Masiyal Success!
Made this recipe? We’d love to hear how it turned out!
- Share your photo on Instagram @indiarecipestoday and tag us
- Leave a rating below – your feedback helps others discover great recipes
- Subscribe to our newsletter for 3 new healthy recipes every week, straight to your inbox